In my one of my previous posts I covered a process of setting up Wireguard server on Docker. While Wireguard is a great choice for VPN protocol, as it’s known for its reliability, speed and good encryption, they way it handles handshakes is easily detectable and can be blocked by ISP firewalls. Same applies to other well known VPN protocols, such as: OpenVPN, IPsec and L2TP. A number of countries have introduced measures to block VPN protocols which can cause major problems for users who use them to connect office LAN or for whatever other purposes.
There are some other protocols that are detectable on a packet level as they obfuscate traffic to look like normal https. A good example is Shadowsocks, however, it can also be blocked by using active probing.
VLESS-REALITY VPN
Currently VLESS-REALITY looks to be a future-proof solution for VPN which is hard to detect at least at the moment of writing this post.
VLESS
According to Project X website VLESS is a stateless lightweight transport protocol, which is divided into inbound and outbound parts, and can be used as a bridge between Xray clients and servers.
It is important to note that VLESS itself does not have built-in encryption, so you need to use a reliable layer of encryption, such as TLS or REALITY.
REALITY
REALITY implements full TLS using the SNI of a camouflage website. This eliminates the TLS fingerprint of the server, while preserving perfect forward secrecy and preventing certificate chain attacks. It is not only more convenient, it also provides greater security than conventional TLS.
Prerequisites
There are several ways on how you can configure a VPN using VLESS-REALITY protocols. It runs on different hardware and OS’s. You can run it on Raspberry Pi, OpenWRT, on a server as standalone or within Docker container.
For my setup I’ve chosen to run it within docker and I will cover this option in my guide below. It also looks like the process has not been documented very well, so I had to go through some struggle googling and reading through a lot of forum posts in order to finally figure it out. Hopefully this guide will make life easier for somebody looking to implement a similar solution.
To follow this guide you will need:
- Linux VM with docker installed. In my case I run Ubuntu 22.04. I have covered of installing Docker in my previous posts. You can get a VM on any cloud provider, such as Digital Ocean. The link contains my referral code and it will grant you some free credits.
- Valid domain name which is configured to point to your VM. It is needed in order to get a valid SSL certificate from LetsEncrypt using
certbot. You can also setup the self-signed certificates, but it will require some extra configuration and I will not cover it in this post. You can check the documentation for how to set it up.
First steps
Very first step is to get valid SSL certificates from LetsEncrypt. In one of my previous posts I have covered the process on how to do it when you have a Nginx server running.
In fact you do not even need a Web server to get your certificates, certbot is able to retrieve them in standalone mode.
First let us make sure that our firewall has holes for http and https ports:
sudo ufw allow 80/tcp
sudo ufw allow 443/tcp
Next let’s run certbot to receive a certificate. --standalone flag is used because this machine does not have a web server running. Change domain.com to your valid domain name.
sudo certbot certonly --standalone -d domain.com
If you don’t have certbot installed: sudo apt-get install certbot -y
certbot will do its magic and shortly you will be prompted with paths for your certificate:
Certificate is saved at: /etc/letsencrypt/live/domain.com/fullchain.pem
Key is saved at:         /etc/letsencrypt/live/domain.com/privkey.pem
Save these paths as we will need them later.
It is good idea to also test that the renew process is working:
sudo certbot renew --dry-run
You should be prompted something like:
Saving debug log to /var/log/letsencrypt/letsencrypt.log

- - - - - - - - - - - - - - - - - - - - - - - - - - - - - - - - - - - - - - - -
Processing /etc/letsencrypt/renewal/domain.com.conf
- - - - - - - - - - - - - - - - - - - - - - - - - - - - - - - - - - - - - - - -
Simulating renewal of an existing certificate for domain.com

- - - - - - - - - - - - - - - - - - - - - - - - - - - - - - - - - - - - - - - -
Congratulations, all simulated renewals succeeded:
/etc/letsencrypt/live/domain.com/fullchain.pem (success)
- - - - - - - - - - - - - - - - - - - - - - - - - - - - - - - - - - - - - - - -
If you don’t see any errors, the SSL certificate is set and will be updated automatically by certbot.
Installing 3X-UI panel
3X-UI panel is an amazing frontend for setting up, monitoring and managing VPN tunnels. You can set-up tunnels using several different protocols in mater of minutes.
On the project’s github page you can see instructions on how to install the panel, however, unfortunately the Docker instructions are incomplete.
First let us clone the repository:
git clone https://github.com/MHSanaei/3x-ui.git
Next in the directory we need to make some adjustments in docker-compose.yml file and add a path to recently created SSL certificates. In order to do it you need to change the original line $PWD/cert/:/root/cert/ to /etc/letsencrypt/:/etc/letsencrypt/:rw.
In addition to that, you’ll need to specify your hostname.
So the final version of our docker-compose.yml will look something like this:
---
version: "3"

services:
3x-ui:
    image: ghcr.io/mhsanaei/3x-ui:latest
    container_name: 3x-ui
    hostname: domain.com
    volumes:
    - $PWD/db/:/etc/x-ui/
    - /etc/letsencrypt/:/etc/letsencrypt/:rw
    environment:
    XRAY_VMESS_AEAD_FORCED: "false"
    tty: true
    network_mode: host
    restart: unless-stopped
Now we can start our container
docker compose up -d
3X-UI initial configuration
Word of warning: with default settings our panel is very insecure. It runs on http, with default credentials login: admin and password: admin on port 2053.
Make sure to change the user/password on first login and force SSL
I assume you are running a ufw firewall on you Debian -based Linux system and have all the traffic from outside blocked. So for a sake of configuration we will make a hole on our firewall for port 2053.
sudo ufw allow 2053/tcp
Note! After all the configuration is done you can close the port 2053 on your firewall for extra protection
After that you will be able to login to your panel with default credentials (admin/admin) on http://domain.com:2053/
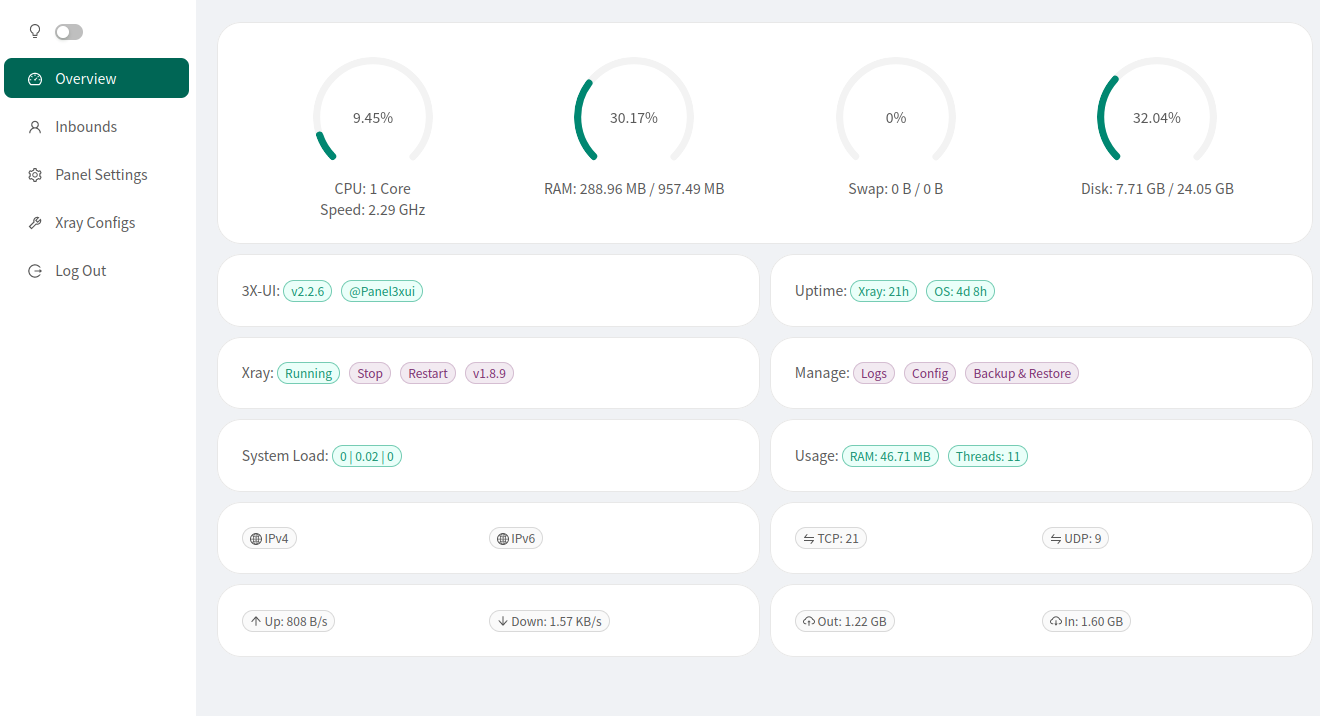
When you login in you will see an Overview of the panel.
Navigate to Panel Settings and under the General tab we will add our SSL certificate paths:
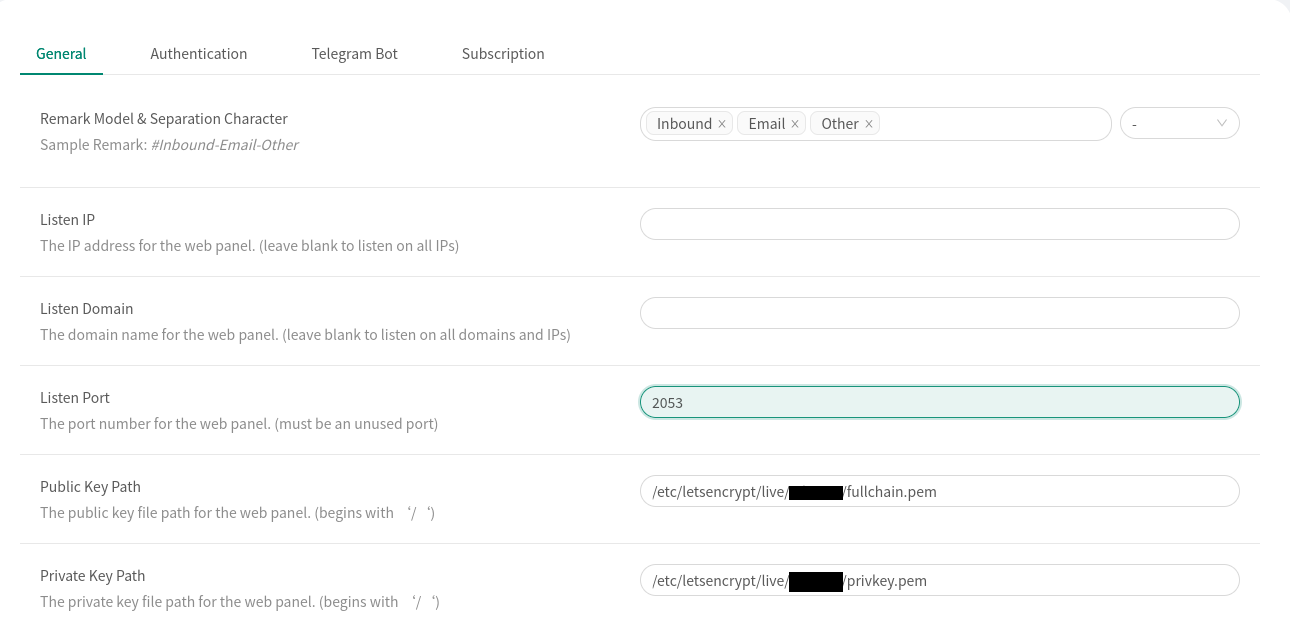
Press Save but do not restart the panel just yet. Instead head to Authentication and change your password (and username). Now you can save and restart the panel after which make sure to login using https://domain.com:2053.
You can also change other settings if you wish, please refer to documentation on the github page for additional information.
Setting up a tunnel
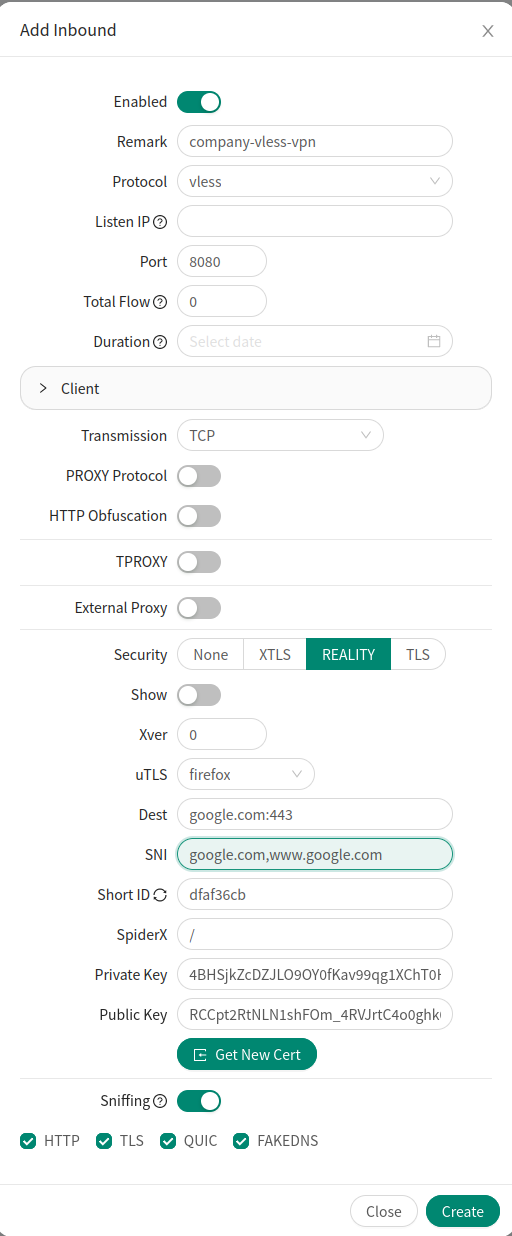
To setup a tunnel, head to Inbounds and click on Add Inbound button.
Do not yet touch the Client configuration, we will deal with it in the next step.
In the Remark field it is good to give the tunnel an appropriate name.
Choose a Port number. It is good idea to use some common web port, such as https 443. In my case it is already in use so I set my port to 8080.
For Security you should chose REALITY.
As uTLS you can chose any browser you like, in my case I use firefox.
In the Dest and SNI fields we will add the URLs that the traffic will pretend to be destining to.
Finally in the bottom click on Get New Cert button.
For all the other options you should use the defaults.
Setting up users
Now you can click open the Client section.
You can see an auto-generated client. You can modify an Email field if you want or live it as is.
There is no need to modify additional fields if you do not want to limit the traffic quota etc for the user.
Now you can press Create to create your client.
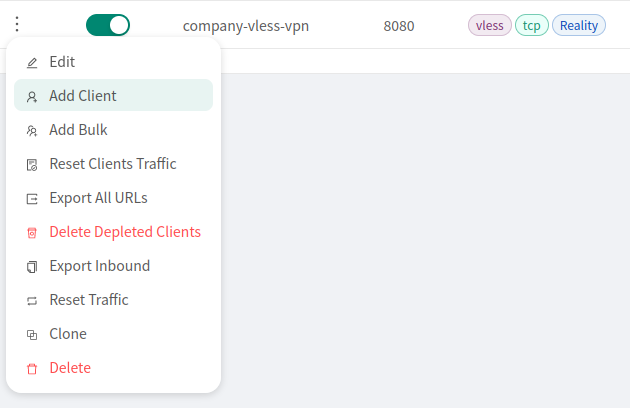
If you want to add additional users, you can do so by pressing the 3 dots next to the tunnel name and selecting Add Client option from the list:
Now your tunnel is set and ready for use.
Note! You will need to open a hole in the firewall for the port of your tunnel:
sudo ufw allow 8080/tcp
Setting up clients
Now when your tunnel is ready, the final step is to setup the connection from the client to the VPN.
On the Xray-core website https://github.com/XTLS/Xray-core you can find a list of GUI Clients for different OS’s. I will not go into much details about them. I tried to set up a connection from my Android phone, and for this purpose I used v2rayNG.
The easiest way is to simply scan the QR code which you can get from the panel by clicking the icon next to the user:

Final words
Now your tunnel should be up and running.
In this guide I only covered the brief necessary steps on how to deploy VLESS-REALITY VPN on docker using 3x-ui frontend. For additional setup and settings please refer to documentation.
The resources I used to compile this guide were: